August 31, 2011

tee sea be

20110830_blog01-web
20110830_blog04
20110830_blog02-web
20110830_blog05-web
20110830_blog06
20110830_blog07
20110830_blog03-web
brass whistle necklace - vintage via etsy / striped shirt - thrifted / belt - vintage, thrifted / skirt - homemade from a dress, Old Navy (tutorial here!) / sandals - Stockholm tourist shop

After a long night of uploading trouble, template snafus, and the usual last-minute-before-a-deadline frustrations, my stinkin' portfolio is done! Nothing to do but wait for it to be printed and delivered. Now, let us never speak of this again.

Yesterday's outfit was entirely made up of the tried-and-true - I'm still loving my new black floral skirt and my Hasbeens-esque sandals from Sweden, and just added a recently thrifted shirt to the mix. I never met a striped, bateau-neck, 3/4 sleeve shirt I didn't like, and I'm reasonably certain one can never have too many of them. (My boyfriend might contest this last claim.) Now if you'll excuse me, I have a little celebratory breakfast-and-thrifting to do.

August 29, 2011

lakeside

2011_0829_blog01-web
2011_0829_blog04
2011_0829_blog06
2011_0829_blog03-web
2011_0829_blog05
2011_0829_blog07
2011_0829_blog02-web
necklace - Anthropologie / striped sweater - Gap, thrifted / jeans - Old Navy / woven flats - UO

This isn't the most exciting outfit I've ever blogged, but to be honest, it's hard to feel inspired to 'dress-up' when I'm spending so much time indoors, metaphorically chained to my desk! Fortunately I am nearing the finish line on my portfolio, and I should finally be done working on it (and complaining about it) tomorrow.

We did take a little break from working this afternoon to walk down to this little lake. I'm a definite city-kid, so it's still a little mind-blowing to me to find places like this just down the road from Chris' house. The weather was just gorgeous, and I love that it's actually cool enough to wear a light sweater again. I love the long days and cicada-songs of summer, but fall is by far my favorite season so I'm glad to feel it slowly creeping up on us.

August 28, 2011

weekend project: from dress to skirt

skirtFinished

Whew! My apologies for my recent absence here on the blog, but it's been a crazy few days. On top of working around the clock to try and get my portfolio finished early this week, we took a trip out to Amherst yesterday to help Chris' brother move into a new apartment, and, like many others on the East Coast, spent the last twenty-four hours in full-on hurricane brouhaha. Fortunately we only wound up experiencing a five hour power outage and some really minor flooding in the basement today.

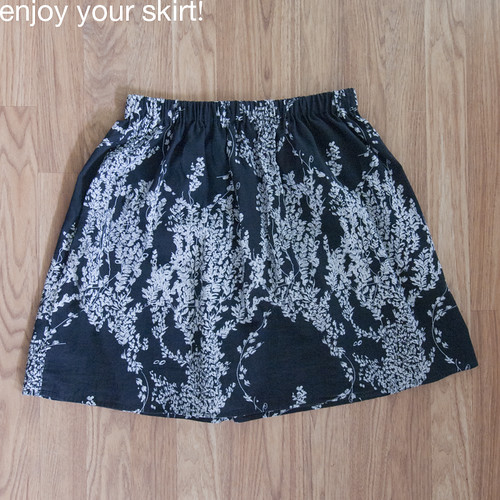
Anyway, here is the dress-to-skirt tutorial I alluded to earlier this week - what better time than a day of rotten weather to finally transform an underutilized dress into a skirt you'll love? While it has been sad to see our travels wind down these last few weeks, one of the things I've most looked forward to about coming back to the US is getting back to making things. I get a lot of questions here about how I've made or altered many of the clothes I wear, and now I'm excited to post a lot more sewing and DIY projects here on the blog. This tutorial is the first installment of a new feature I'm calling 'Weekend Projects' - every week or so, I'll post a tutorial for a new project with step-by-step photos, instructions, and answers to any questions you guys might have in the comments. The type of projects will vary week-to-week, including sewing projects (both constructing new garments and altering existing clothes), jewelry-making, some home improvement/decorating projects (once we have a home of our own, ha!) and probably even a bit of cooking here and there - but will generally be of a scale that can be accomplished in the course of a Sunday afternoon. AND, should any of you try out these tutorials, please send me a photo and/or a link to your blog, as I would love to feature your handiwork here the following week!

So, all that business out of the way, let's get to making a skirt, shall we? You'll need:

skirtTutorial_step00

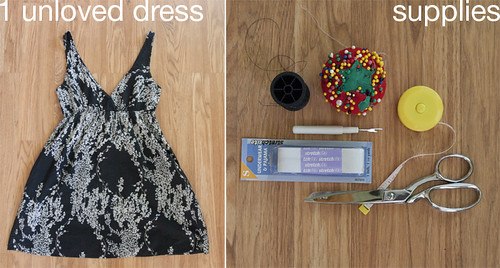
An unloved dress with a fairly full skirt; thread that matches your fabric color; lots of pins (including one safety pin); a seam-ripper (or small scissors, good eyes, and a steady hand); a measuring tape or yardstick; 1-1.5" wide elastic, at least long enough to go around your waist; scissors; an iron and ironing board; and a sewing machine (or a hand-sewing needle and an enormous amount of patience).

skirtTutorial_step01

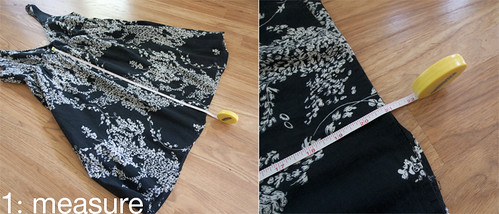
Step 1: Measure another skirt whose length you like to determine how long you want your new finished skirt to be. I decided I wanted my skirt to be 18.5" from the top of the waistband to the hem. Now measure from the bottom of the dress hem to the existing waistband - you'll need it be at least the desired length of your skirt plus the width of your elastic plus another half inch or so. In my case, I needed 18.5" skirt length + 1" elastic + .75", or 20.25", and my dress was 21" from hem to waistband - perfect!

skirtTutorial_step02

Step 2: Separate the top half of the dress from the bottom/skirt half. If after measuring, you found that the skirt of your existing dress is a great deal longer than what you need, you can just carefully snip along the underside of the existing waistband with scissors to separate the two halves; if, like me, you find that the current length is pretty close to what you'll need for your skirt, pick out the stitches along the existing waistband with your seam ripper. You just want to remove any existing elastic and separate the 'skirt' half from the top half of the dress - be sure not to rip open the side seams, or you'll just need to re-sew them. If your dress doesn't have a waistband per se, you'll need to mark a place to cut it in half with scissors; measure up from the hem and mark your desired length from Step 1 (plus maybe an inch or so, just in case) with pins or chalk, then carefully snip off the top half. Err on the safe side - you can always trim off any extra fabric later, but it's much harder to put back what you've already cut off.

skirtTutorial_step03

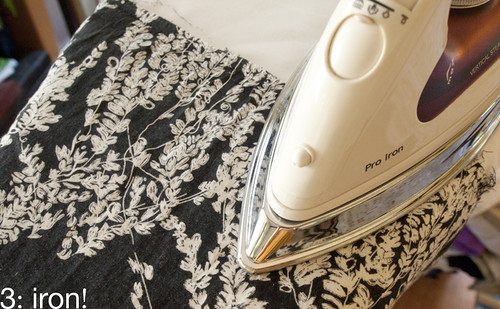
Step 3: Once you've separated the two halves of your dress, slip your 'skirt' half onto your ironing board, wrong-side out, and iron it all the way around to get out any wrinkles or gathers from the old waistband. Leave it on the board for the next few steps.

skirtTutorial_step04

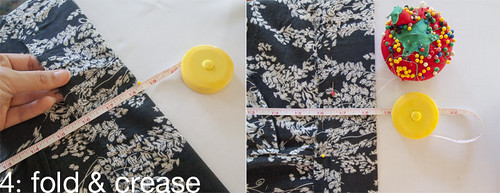
Step 4: Now you're going to fold over the top, unfinished edge of your skirt to make your new waistband. Measure straight up from the existing hem and fold over the top edge until you meet your desired length (in my case, 18.5"). Work your way all the way around the top edge, re-checking your measurement every 1.5" or so, and pinning as you go, until the top edge is folded and pinned all the way around at your desired length. Go over the folded edge with your iron (watching out for pins and moving them as needed) to make a nice, firm crease all the way around. We'll call this 'Crease A.'

skirtTutorial_step05

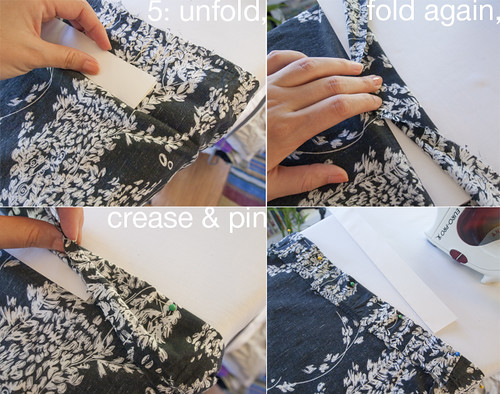
Step 5*: Cut a strip of paper or cardstock the width of your elastic plus 1/4" - in my case, I cut a folded sheet of heavy paper to make a strip 1.25" wide. Unpin the folded edge of your skirt, and gently unfold Crease A. Place your paper strip just above the crease line, between the crease and the rough, unfinished edge at the top. Holding your paper guide so that the lower edge is right at Crease A, fold the top edge of the fabric over the guide, so that you create a new fold line ('Crease B') 1.25" above Crease A. Carefully iron the new fold (do your best not to iron over the original crease line, you'll need it again), then remove the paper guide and pin the folded edge. Working your way around the entire circumference of the skirt, repeat this step every few inches, until you have a new pinned crease all the way around.

skirtTutorial_step06

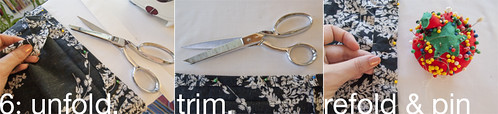
Step 6: Once you've got your second crease ironed in, you can trim off any excess fabric at the top edge. Snip off the rough edge all the way around, about 3/8" - 1/2" from Crease B. Unpin all the way around, and fold the fabric back over at Crease B, then Crease A, and repin it all the way around. You should now have two nice folded edges showing, with the cut edge of the fabric hidden inside. This will become the casing for your new elastic waistband.

skirtTutorial_step07

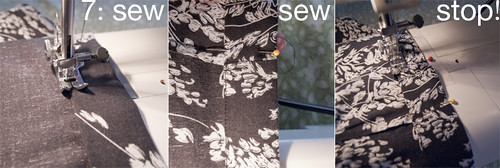
Step 7: Now you're going to carefully sew along the edge of Crease B, about 1/8" or less inside the fold. Mark your starting point with a prominent pin and add another pin 2" above the first to mark your stopping point. Sew almost all the way around, stopping at your second pin to leave a 2" gap. Pull your threads through to the 'wrong side' of the skirt fabric and tie off your thread at the beginning and end of your seam. You now have a casing for your elastic running all the way around the top of your skirt.

skirtTutorial_step08

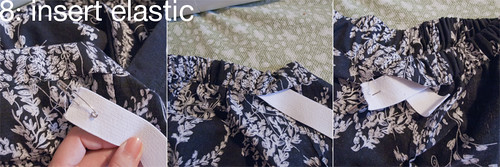
Step 8: Measure your natural waist comfortably with your measuring tape. Without stretching it, cut your elastic to the same measurement - when you sew the two ends together later, you'll get a little stretch, which will help keep the skirt in place while wearing. Put a safety pin through one end of the elastic to help thread it through your waistband. Insert that end into your 2" opening, and start working it through the casing, being careful not to twist the elastic inside the casing. Allow the fabric to bunch up as you go, taking care not to pull in the tail end of the elastic, and eventually you should have both ends of the elastic sticking out of your opening.

skirtTutorial_step09

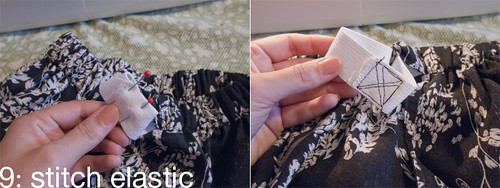
Step 9: Double check that your elastic is smooth and not twisted all the way around your waistband, then overlap the two ends and pin them together. Carefully stitch over the overlapped section a few times to make sure your stitches won't come out when stretched (my machine was skipping stitches like none other, so my elastic looks pretty sloppy here - fortunately none of that will show in the finished product!).

skirtTutorial_step10

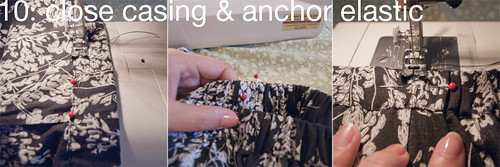
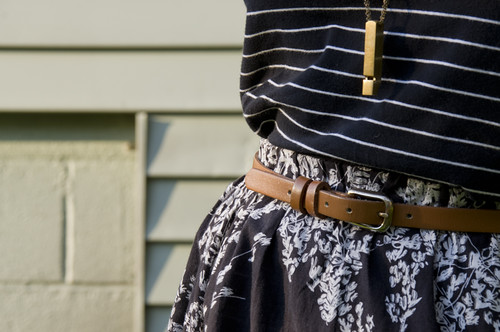
Step 10: Release the stitched-together section of elastic and give the whole waistband a little stretch - this should pull the ends in through the opening in the casing and smooth everything out a bit. Pin the 2" section you left open, and sew it closed exactly as you did the rest of the casing. Optional: I also like to add a little stitching at the two side seams to ensure the elastic doesn't twist inside the waistband with wearing/washing. Work the fabric of the waistband around until the side seams of the skirt are equidistant (i.e. when you press the skirt down flat on a table, unstretched, the side seams should align with the outside folded edges of the unstretched elastic), then pin right through the elastic at the side seams. At both sides, sew a short seam on top of the existing side seams, right across the elastic, and tie off the ends on the inside of the skirt.

skirtTutorial_step11

Enjoy your new skirt! You can see how I wore mine here. If you have any questions, let me know in the comments and I'll do my best to help - this is my first attempt at writing a sewing tutorial, and I am sure there are lots of ways I could make things clearer. And if any of you try this tutorial out, please feel free to email me - I'd love to share your handiwork here next week!

*This step is probably needlessly complicated, but I really hate measuring and came up with the paper guide system as a way to avoid doing it a second time. If this seems overly complicated to you, you can always skip it by opening up your first crease and essentially repeating the previous step, just adding the width of your elastic plus 1/4" to your measurement from Step 4 to create a new 'Crease B.' Be careful not to iron out the crease from Step 4 as you go, you'll need it again.

August 24, 2011

color therapy

2011_0824_blog01-web
2011_0824_blog08
2011_0824_blog03-web
2011_0824_blog06
2011_0824_blog07
2011_0824_blog05-web
2011_0824_blog02-web
necklace - vintage, thrifted / silk blouse - Express, thrifted / watch - Arkanoplatz flea market, Berlin / jeans - Uniqlo / suede heels - UO / lipstick - Revlon Moon Drops in Orange Flip / polish  - Essie Meet Me at Sunset (red-orange) & Super Bossa Nova (fuscia)

Since getting back from our trip, I have spent almost all of my waking hours sitting at a desk, staring at a laptop and working on a portfolio to bring to job interviews. It is stressful, time-consuming work, made all the more frustrating by my discovery of just how bad I've been about documenting my professional work over the years. This morning I found myself feeling totally overwhelmed by my growing to-do list - on top of this portfolio, I owe a former professor some copy for a book, need to finish a few guest posts I promised to write ages ago, am itching to do a some design work here on the blog, and have a whole heap of emails and comments to respond to (something I am pathetically slow about in even the best of times) - and I realized I badly needed to step back and re-center myself.

Tania talked in her post today about the influence getting 'dressed' can have on our professional performance, and she couldn't be more right; I made myself take a break, swapped my yoga pants for jeans and a new-to-me silk button-down (admittedly a very wrinkly one, as I have yet to wash it - gross, I know), and even took a minute to paint my nails. These heels were conveniently sitting next to my desk (I just ordered their colorful cousins and needed to check the size), so I added them for an extra 'fancy' touch. I felt miles better after spending just a few minutes on myself, and while I still have quite lot still to do on my list, at least my nails are brightening up my keyboard a bit.

August 23, 2011

chopped

2011_0823_blog01-web
2011_0823_blog03-web
2011_0823_blog05
2011_0823_blog06
2011_0823_blog04-web
2011_0823_blog02-web
purse - Athens tourist shop / chambray shirt - Banana Republic, thrifted / belt - vintage, thrifted / skirt - altered from a dress, Old Navy / clog sandals - Stockholm tourist shop

This skirt used to be dress; I bought it on clearance years ago because I loved the airy, printed cotton and the fact that it had pockets, but the fit just never worked for me as a dress. It had an always-on-the-verge-of-wardrobe-malfunction surplice bodice and an un-beltable empire waist, and it wasn't long until I found myself folding in the top half and just wearing it as a skirt every time. I unpacked it over the weekend and started wearing it that way on Saturday morning, but by lunchtime I was so fed up with fussing with my improvised skirt that I finally cut the top half off and put in a proper waistband. I can tell I'm going to get a lot more wear out of it now - in fact, I've already worn it three times since chopping it! I even remembered to take the time to photograph the transformation (a rare feat when I get the instant gratification sewing itch!), so I'll be posting a simple dress-to-skirt sewing tutorial later this week.

August 22, 2011

technicolor

2011_0822_blog01-web
2011_0822_blog03
2011_0822_blog07
2011_0822_blog05
2011_0822_blog04-web
2011_0822_blog06
2011_0822_blog02-web
necklace - vintage, Brooklyn flea market / striped shirt - Gap / braided belt - vintage, thrifted / red jeans - thrifted / woven flats - UO

I mentioned on Friday that I'd had an incredibly fruitful thrifting trip. I went to two of my favorite thrifts, looking for colored jeans, an olive blazer, work-appropriate t-shirt alternatives, a mustard pencil skirt, a Fairisle sweater, the perfect jean jacket, and, of course, stripes of any kind - and I came away with these red jeans, an olive-y military blazer, two bright silk tops, a cobalt silk button-down, a cobalt wool pencil skirt, a navy breton-striped sweater, and a kilim and leather belt. I couldn't believe my luck! I was especially thrilled to find these bright, bright jeans; I love the colored denim trend, and I've already got at least a dozen different outfits in mind to wear them with. However, I just happened to be wearing this necklace, shirt, belt and shoes on my thrifting trip, and they went so well with these pants in the dressing room on Friday that I immediately reached for the exact same pieces this morning.

August 19, 2011

last minute

2011_0816_blog01-web
2011_0816_blog03
2011_0816_blog06
2011_0816_blog04-web
2011_0816_blog05
2011_0816_blog02-web
necklace - Forever 21 / striped sweater - H&M / olive tank - Target / tote - Forever 21 / maxi skirt - Target / wood & brass bangle - vintage, thrifted / sandals - Target, thrifted

Oh boy, did I ever underestimate how long it would take me to recover from our flights on Wednesday! I have never been this thrown by a time-change in my life - last night I went upstairs to take a 'nap' at 6:30, slept straight through dinner, and finally woke up this morning at 5! There are at least some benefits to becoming an uncharacteristically early-riser; this morning I had plenty of time to get dressed, have a leisurely breakfast and do some reading, all before my favorite thrift store opened up at 8am. I found a ton of good stuff (I went with a 'fall wardrobe wishlist' in mind and managed to snag about half of what I was looking for), and now I'm itching to get it all to the dry-cleaners so I can really start playing dress-up.

These photos are from our very last day in Sweden. I started off with this tank and my beaded necklace because I love the colors together, but it was a little chilly so I threw on a sweater as we headed out the door. I was a little skeptical about how this shortish, boxy sweater would look paired with a long skirt and nary a waist-defining belt in sight, but I wound up liking this outfit much more than I'd expected - and it's hard to argue with a pairing this comfortable!