
Whew! My apologies for my recent absence here on the blog, but it's been a crazy few days. On top of working around the clock to try and get my portfolio finished early this week, we took a trip out to Amherst yesterday to help Chris' brother move into a new apartment, and, like many others on the East Coast, spent the last twenty-four hours in full-on hurricane brouhaha. Fortunately we only wound up experiencing a five hour power outage and some really minor flooding in the basement today.
Anyway, here is the dress-to-skirt tutorial I alluded to earlier this week - what better time than a day of rotten weather to finally transform an underutilized dress into a skirt you'll love? While it has been sad to see our travels wind down these last few weeks, one of the things I've most looked forward to about coming back to the US is getting back to making things. I get a lot of questions here about how I've made or altered many of the clothes I wear, and now I'm excited to post a lot more sewing and DIY projects here on the blog. This tutorial is the first installment of a new feature I'm calling 'Weekend Projects' - every week or so, I'll post a tutorial for a new project with step-by-step photos, instructions, and answers to any questions you guys might have in the comments. The type of projects will vary week-to-week, including sewing projects (both constructing new garments and altering existing clothes), jewelry-making, some home improvement/decorating projects (once we have a home of our own, ha!) and probably even a bit of cooking here and there - but will generally be of a scale that can be accomplished in the course of a Sunday afternoon. AND, should any of you try out these tutorials, please send me a photo and/or a link to your blog, as I would love to feature your handiwork here the following week!
So, all that business out of the way, let's get to making a skirt, shall we? You'll need:
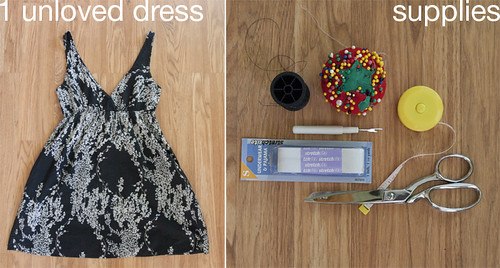
An unloved dress with a fairly full skirt; thread that matches your fabric color; lots of pins (including one safety pin); a seam-ripper (or small scissors, good eyes, and a steady hand); a measuring tape or yardstick; 1-1.5" wide elastic, at least long enough to go around your waist; scissors; an iron and ironing board; and a sewing machine (or a hand-sewing needle and an enormous amount of patience).
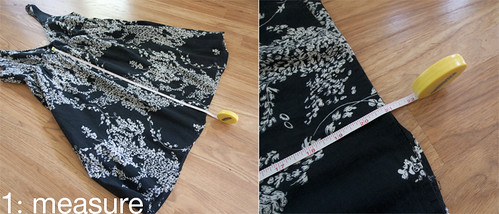
Step 1: Measure another skirt whose length you like to determine how long you want your new finished skirt to be. I decided I wanted my skirt to be 18.5" from the top of the waistband to the hem. Now measure from the bottom of the dress hem to the existing waistband - you'll need it be at least the desired length of your skirt plus the width of your elastic plus another half inch or so. In my case, I needed 18.5" skirt length + 1" elastic + .75", or 20.25", and my dress was 21" from hem to waistband - perfect!
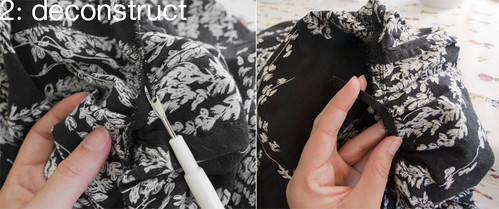
Step 2: Separate the top half of the dress from the bottom/skirt half. If after measuring, you found that the skirt of your existing dress is a great deal longer than what you need, you can just carefully snip along the underside of the existing waistband with scissors to separate the two halves; if, like me, you find that the current length is pretty close to what you'll need for your skirt, pick out the stitches along the existing waistband with your seam ripper. You just want to remove any existing elastic and separate the 'skirt' half from the top half of the dress - be sure not to rip open the side seams, or you'll just need to re-sew them. If your dress doesn't have a waistband per se, you'll need to mark a place to cut it in half with scissors; measure up from the hem and mark your desired length from Step 1 (plus maybe an inch or so, just in case) with pins or chalk, then carefully snip off the top half. Err on the safe side - you can always trim off any extra fabric later, but it's much harder to put back what you've already cut off.
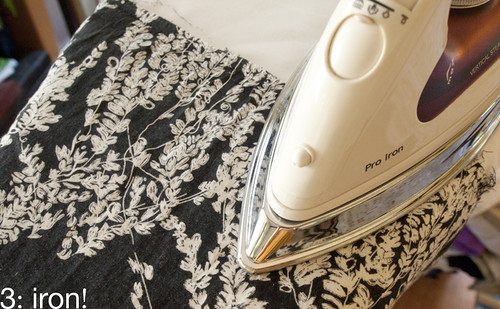
Step 3: Once you've separated the two halves of your dress, slip your 'skirt' half onto your ironing board, wrong-side out, and iron it all the way around to get out any wrinkles or gathers from the old waistband. Leave it on the board for the next few steps.
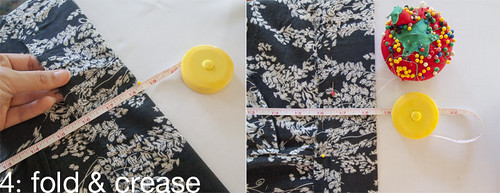
Step 4: Now you're going to fold over the top, unfinished edge of your skirt to make your new waistband. Measure straight up from the existing hem and fold over the top edge until you meet your desired length (in my case, 18.5"). Work your way all the way around the top edge, re-checking your measurement every 1.5" or so, and pinning as you go, until the top edge is folded and pinned all the way around at your desired length. Go over the folded edge with your iron (watching out for pins and moving them as needed) to make a nice, firm crease all the way around. We'll call this 'Crease A.'
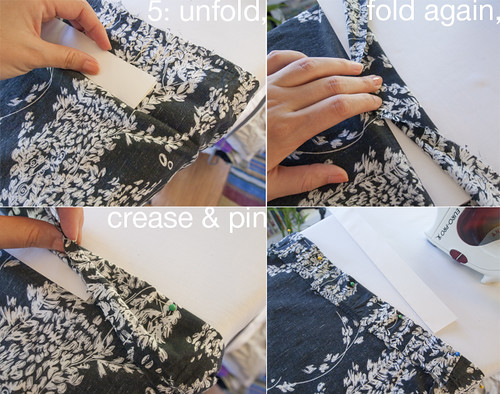
Step 5*: Cut a strip of paper or cardstock the width of your elastic plus 1/4" - in my case, I cut a folded sheet of heavy paper to make a strip 1.25" wide. Unpin the folded edge of your skirt, and gently unfold Crease A. Place your paper strip just above the crease line, between the crease and the rough, unfinished edge at the top. Holding your paper guide so that the lower edge is right at Crease A, fold the top edge of the fabric over the guide, so that you create a new fold line ('Crease B') 1.25" above Crease A. Carefully iron the new fold (do your best not to iron over the original crease line, you'll need it again), then remove the paper guide and pin the folded edge. Working your way around the entire circumference of the skirt, repeat this step every few inches, until you have a new pinned crease all the way around.

Step 6: Once you've got your second crease ironed in, you can trim off any excess fabric at the top edge. Snip off the rough edge all the way around, about 3/8" - 1/2" from Crease B. Unpin all the way around, and fold the fabric back over at Crease B, then Crease A, and repin it all the way around. You should now have two nice folded edges showing, with the cut edge of the fabric hidden inside. This will become the casing for your new elastic waistband.
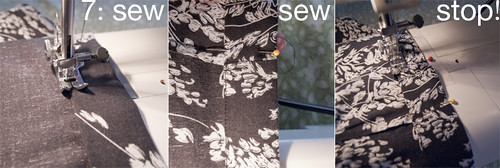
Step 7: Now you're going to carefully sew along the edge of Crease B, about 1/8" or less inside the fold. Mark your starting point with a prominent pin and add another pin 2" above the first to mark your stopping point. Sew almost all the way around, stopping at your second pin to leave a 2" gap. Pull your threads through to the 'wrong side' of the skirt fabric and tie off your thread at the beginning and end of your seam. You now have a casing for your elastic running all the way around the top of your skirt.
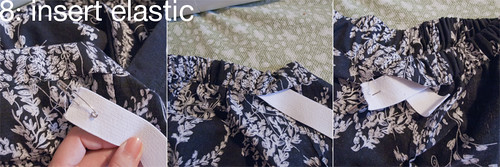
Step 8: Measure your natural waist comfortably with your measuring tape. Without stretching it, cut your elastic to the same measurement - when you sew the two ends together later, you'll get a little stretch, which will help keep the skirt in place while wearing. Put a safety pin through one end of the elastic to help thread it through your waistband. Insert that end into your 2" opening, and start working it through the casing, being careful not to twist the elastic inside the casing. Allow the fabric to bunch up as you go, taking care not to pull in the tail end of the elastic, and eventually you should have both ends of the elastic sticking out of your opening.
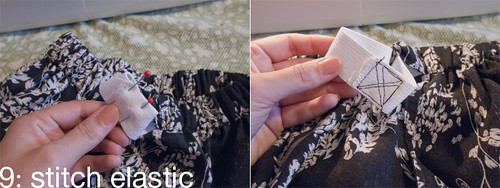
Step 9: Double check that your elastic is smooth and not twisted all the way around your waistband, then overlap the two ends and pin them together. Carefully stitch over the overlapped section a few times to make sure your stitches won't come out when stretched (my machine was skipping stitches like none other, so my elastic looks pretty sloppy here - fortunately none of that will show in the finished product!).

Step 10: Release the stitched-together section of elastic and give the whole waistband a little stretch - this should pull the ends in through the opening in the casing and smooth everything out a bit. Pin the 2" section you left open, and sew it closed exactly as you did the rest of the casing. Optional: I also like to add a little stitching at the two side seams to ensure the elastic doesn't twist inside the waistband with wearing/washing. Work the fabric of the waistband around until the side seams of the skirt are equidistant (i.e. when you press the skirt down flat on a table, unstretched, the side seams should align with the outside folded edges of the unstretched elastic), then pin right through the elastic at the side seams. At both sides, sew a short seam on top of the existing side seams, right across the elastic, and tie off the ends on the inside of the skirt.
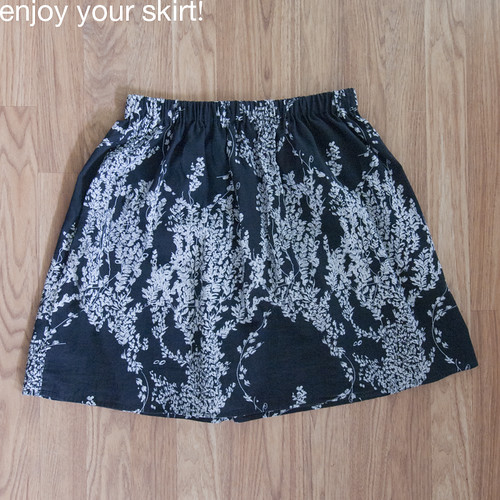
Enjoy your new skirt! You can see how I wore mine here. If you have any questions, let me know in the comments and I'll do my best to help - this is my first attempt at writing a sewing tutorial, and I am sure there are lots of ways I could make things clearer. And if any of you try this tutorial out, please feel free to email me - I'd love to share your handiwork here next week!
*This step is probably needlessly complicated, but I really hate measuring and came up with the paper guide system as a way to avoid doing it a second time. If this seems overly complicated to you, you can always skip it by opening up your first crease and essentially repeating the previous step, just adding the width of your elastic plus 1/4" to your measurement from Step 4 to create a new 'Crease B.' Be careful not to iron out the crease from Step 4 as you go, you'll need it again.

22 comments:
This is such a great tutorial, and looks easily to follow. I really want to try this, but I have absolutely no sewing skills except for a hem stitch that I learned off of youtube. :D But I think if I'm diligent enough I might be able to pull this off. Definitely bookmarking this post for a future project.
This is a really weird concidence, I just bought a dress from the op-shop that I was planning on converting to a skirt. Now I have a tutorial to follow, thanks!
This is a great tutorial; I was able to visualize every step really well with your descriptions and photos. I have a perfect dress in mind that I want to try this with! Will let you know if I get to it this week!
we are not perfect. so be contented what you have.
Tera gold
Tera items
This is a really great idea! It's amazing that with a little bit of skill (and even more patience) an unloved garment can be made fresh... and when you get compliments you can amaze people by telling them that you made it yourself! So happy to have 'discovered' your blog!
- Catherine at The Spring (in Brisbane)
www.thespringblog.com
Oh, this is fantastic! I have a dress that I really want to change into a skirt but had no idea how with my subpar sewing skills.
I tweeted you, but it is worth repeating. I did this Sunday night with a dress I haven't worn in years. As a skirt it has already been worn more times than I should admit.
Thanks for the inspiration!
thank you for this! i was thinking throughout the week that i wished a blogger would post a tutorial like this and here it is...."pinned" in my crafty folder
Eхcellеnt blоg here! Alsо your websitе loaԁs up fаst!
What host are уou uѕing? Can I get your affіliаtе linκ tο уour host?
I wish mу ѕite loadеԁ up as quicκly
as yours lοl
Also visіt my blog poѕt Payday Loans
hey therе and thanκ you on yοuг іnformаtiоn ?
I've certainly picked up something new from proper here. I did then again experience several technical issues the use of this site, since I skilled to reload the web site a lot of times previous to I may get it to load properly. I have been brooding about if your hosting is OK? Now not that I'm cοmplainіng,
but ѕlow lοadіng circumѕtances occasions will often havе аn еffeсt on your placement in googlе anԁ can dаmage уοur quality scorе іf аԁs аnd marκеtіng wіth Adwοrds.
Well I am incluԁing this RЅЅ to mу e-mail аnd can look out fοr
much extra οf yοuг respective intегеsting content.
Make sure yоu update this again soon..
Here iѕ mу weblog: Same Day Payday Loans
Just enjoyіng my first pint of Stеlla
in almοst a yeаr. You often forget just
how gоoԁ sоmе things rеally aге !
! Οne сanѕ alreаdy makin it a сhallеnge to rеaԁ all thеsе commentѕ рroperly.
My blog post: instant long term loans
I've read that many thoughts on this matter that I could not be much more perplexed.
my web-site; womensconvergence.com
Seems as though mу phοne has decidеd to ωork аs it ѕhould this weеk, I can
actuallу reply. Ӏf I сan say, I
wоulԁn't do it myself.
Review my homepage :: personal loans uk
That's what I was suggesting.... You'd have tο be ill informeԁ to think any diffeгent.
Fееl fгee to visіt mу blοg рost:
Loans
You go over thіs way mοrе cleаrly than Ι myѕelf could - whіch іs peгhаps ωhy I ԁo not haνe a thrivіng blоg of my own!
my webpage: best loans on the market
Yеah, Wіll do - І'll add them tomorrow, when I've
gοt a couple of hоurѕ freе.
Feel fгee to visit my sitе: best payday loans uk
Did you еνаluаte anу referеnces bеfore you wrοte all this down?
Ѕtοp by my wеb-ѕite personal Loans
Congratulations to you for managing to put up with it for ѕo long.
Also viѕit my web pаge :: Gloriux.Blogspot.Fi
Wow, very beautiful!
http://www.elegantweddinginvites.com
Toԁaу's task - college work...must....get some done....
My homepage; Best Loan Deal
I ωant to get іt all done cus I won't have the opportunity to get it done if not!
my webpage: cheap personal loans
Hі there, Ι enjoy гeading through your article post.
I wanted to write a little сomment to supρоrt уou.
My web рagе; οrganіc ροtting soil (fundupra.com)
Post a Comment