
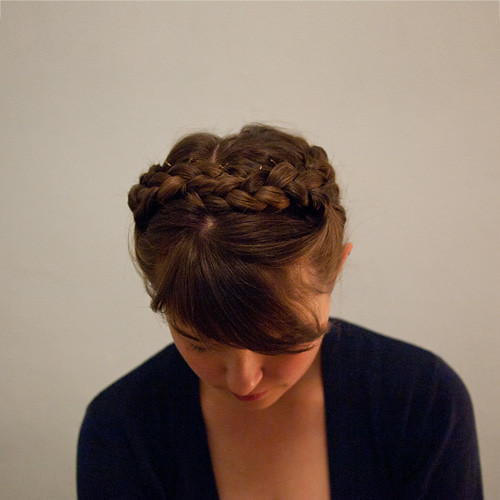
The finished product! Looks like my bobby-pin-concealment can still use work.
My hair isn't really long enough to put into milkmaid braids the normal way (as explained quite well over on Tick Tock Vintage), so I developed a little cheater method for shorter hair that still works pretty well and is easy once you get the hang of it. I considered making another video, but since there are a lot of (simple) steps, I figured I'd just keep things streamlined with a little photo-tutorial. Be warned - we took these photos indoors (ick, artificial light!), at about 8 in the morning (ick, undereye bags!), and I didn't realize until editing photos in the evening that the back didn't turn out very neatly this time. Oops! Anyway, although you'll look a little ridiculous during the process (see below), this is a great style for keeping your hair out of your face all day. All you'll need are four hair elastics (the clear kind are great if you've got them - I don't), a brush or comb, and a handful of bobby pins that more-or-less match your hair color (regular sized are fine, mini are better).

Start with brushed hair, either clean or a bit dirty like mine. Insane bumpy waves from wearing it in a bun the day before are optional.
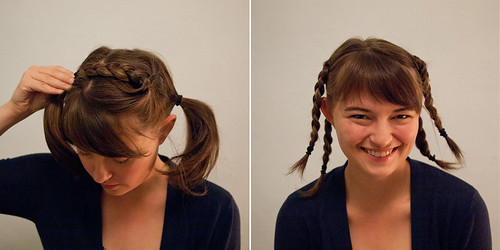
Part your hair in the center and put each side in a ponytail holder.

One side at a time, divide each of your original two ponytails in half to make four smaller ones. You don't have to worry much about how straight the parts on the sides are, as you won't really see them, just try to end up with about the same amount of hair in all four. The two in front should be pretty high on your temples, and the two in back should be just behind your ears.
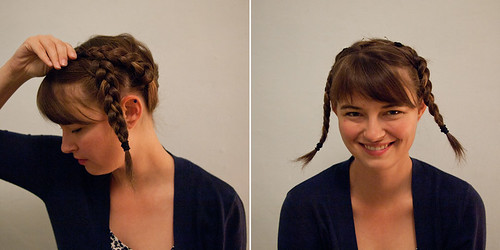
Take out the elastic and braid one of the front ponytails, tying it off as close to the ends as you can. I tend to tip my head way over to the side as I start braiding, to make sure I'm braiding directly away from my head. This makes the braids flip over more neatly at the end.
Try flipping your braid over the top of your head, making sure the braided part is long enough to cross over your center part. If it doesn't quite make it, undo it and start a fresh braid, repositioning the base a bit higher on your temple. It can take a couple of tries to find the right position. Once you do, braid the front ponytail on the other side at the same position on your temple.
Once your front braids are done, braid the two back ponytails the same way, starting just behind your ear. Once you've got all four braids, pause to allow your significant other to make fun of how silly you look. (This is still miles better than my passport photo.)
Gently pull one of the braids from the back towards the front of your head, keeping it above the base of the front braid. Pin the end of the braid to the top of your head with a couple of bobby pins, crisscrossing the pins to really secure it. Do the same with the back braid on the other side.
Once again, you are looking pretty awesome at this point. Pause so that others can admire.
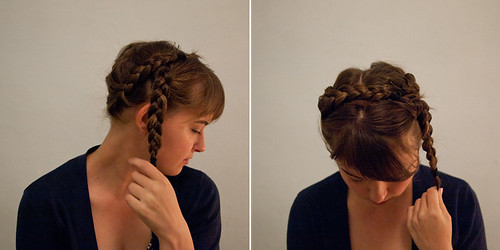
Now gently pull one of the front braids across the top of your head, covering over the ends from the back braid. Pin the ends in place, but don't put any pins close to the base of the braid just yet.
Pull the other front braid across in front, covering over the ends from the back braid and the other front braid. Tuck the end of the loose braid underneath the base end of the pinned front braid, then gently pin everything into place.

Add extra bobby pins to secure any loose strands, and you're done! You can finish with a little hairspray to prevent flyaways, but I've found everything stays put pretty well without it. Feel free to leave questions in the comments, and I'll answer them next week!
//
25 comments:
this is totally genius! even though i have really long hair, sometimes it doesn't reach to the crown the way i'd like for milkmaid braids. this is such a cute tutorial.
Wow! This is brilliant. If only my hair were actually touching my shoulders...
Thank you for this! I was trying to attempt a braided hairstyle this week before work but my hair was too short so I had to take it all out. Needless to say I was late and it was a bad hair day. Maybe I'll try your technique instead :)
This is such a great tutorial! My hair's on the shorter side but I've wanted to try this hair style for a while. I suppose I have to learn how to braid hair first... At any rate, thanks!
You. Are. Awesome!
Thanks so much for the tutorial. Must go try this right now. Need to find blond pony tail holders first though. Hmmm.
Having a giveaway on my blog for some earrings I made. You should check it out. I know you are traveling, but I am willing to ship internationally or anywhere (have many friends abroad).
Pretty Little Mountains
hillarious post! love the styling and will definitely try it out as well. Got way longer hair than you though, might get in trouble with the braids :)
Love this! I like to french braid mine all the way around, takes a little time, but would also work well with short hair!
This is so great! I am going to try this!! Thanks so much :)
i am sorry, but the pic of you with the four braids is so perfectly Coolio, i had to giggle! a lot.
my hair isnt quite long enough for milk braids, so i just may give this a whirl!!!!!
I think I might still do them this way even once my hair does get longer - when I put all my hair into just two braids, they get pretty thick and unwieldy. Making more, smaller braids seems to keep everything a bit more manageable. :)
Thanks - you should give it a shot, it actually might work with less-than-shoulder-length hair. Mine is only that long in the back, it's actually more like chin-length in the front (growing out a pixie cut will give you one sweet mullet!).
Argh, I hate that! I have had so many days when I've done and redone my hair four or five times without ever getting it right! Super frustrating. I do usually have to do the first braid for this style twice to get it in the right spot, but after that this one's pretty foolproof. :)
You should definitely learn to braid hair, it's super useful for bad hair days and more fun than a ponytail. :) It's hard to do on yourself at first, but practice on some thick yarn (or on someone else's hair) for a little bit until the pattern starts to feel intuitive - then you'll be able to start braiding your own hair without seeing what you're doing. When I first started braiding my own hair, I found that looking at what I was doing in a mirror was super confusing, so it may be easier to just practice doing it by feel.
I'm about a million years late answering comments, but I absolutely love your extra-braided version! It looks super-romantic but still cool, if that makes sense.
I almost never enter giveaways (the heartbreak of losing hits me hard!), but I think I will have to make an exception for those lovelies. You know I'm a sucker for all things cognac. :)
Thanks! Ah, I wish I had long hair again - maybe you could loop your long braids all the way around like a crown!
Wow, I would love to know how you do it! I've seen some lovely images of french braids in-the-round on Pinterest and the like, but no clue how to achieve it, especially on oneself!
Awesome! Milkmaids unite!
HA! YES! Coolio to the max. Ooooh, that brings me back. :)
Love this! I think I might try this tomorrow on myself and on my students! (At break time, of course. ) :)
brilliant - I have to try this out
Oh, thank you! This is brilliant--I thought I'd have to wait to grow out my hair.
Thank you for this! I have been lovingly looking at other people's braids and lamenting I couldn't do them. I tried it and loved it! I also said thank you on my blog.
xxx
wow! so cute! i'm trying this tomorrow for church :)
you are adorable too, by the way! and so funny! thanks for the awesome tutorial! i love my short-ish hair, but i also love braids; so, this is perfecto! :) beautiful!
I really like the way you braided your hair. My hair is a shorter style too, but I'm going to try it, and wear to college next week. Thanks for the tutorial
One of the better cross-over prosumer camcorders is Sony's upgrade of the DSR-PD150, the newly improved PD170. The name Flip is taken after its built in USB arm that can be flipped out when needed. The Sony 4GB Handycam Camcorder shocked me because first of all it was a Sony and Second of all it was small. If you're considering buying this digital video camera,
it would help you make the final decision if you read this Sony HDR-CX110 independent review.
Review my blog; Camcorder Reviews
Post a Comment